Enter and amend invoices
Find this screen
Open: Invoicing > Invoices > Enter New Invoice
Open: Invoicing > Invoices > Amend Invoice
How to
Enter invoice lines
Open: Invoicing > Invoices > Enter New Invoice
- You can add new lines to the invoice on the grid.
-
Choose the type of item line first, then enter the remaining information:
-
Stock Item: Use to add stock and invoice and order items Use to keep a record of regular lines or products added to orders and invoices where a product record is not required..
Note: The Alerts column will show you when stock item alerts have been set up for this activity and
 icon in the Alerts column.
 -
Free Text: Use to add one-off lines with a description, quantity and value.
-
Charge: Use to add charges such as carriage and insurance.
-
Comment: Use to add any other text you want to show on the invoice.
-
-
Edit a line to view or change information that's not shown in the grid, such as analysis codes or a warehouse.
-
Invoice numbers are assigned when the invoice is saved.
Remove 'Stock' or 'Free Text ' type lines
-
Only entering free text lines? You can remove the Stock line type if you never want to add stock items or Invoice and order items to an invoice.
-
Don't want to use free text lines? You can also remove the Free text line type if you never want to enter these.
To do this:
Open: Settings > Invoicing and Sales Orders > Invoice and Order Settings | Invoice and Order Entry.
-
Set the Order Line entry to allow entry of Free text items only or Standard items only.
Note: Please be aware, this setting also applies to sales orders (SOP), as well as invoicing.
Amend invoices
Open: Invoicing > Invoices > Amend Invoice
-
You can only make changes to an invoice if it hasn't been printed. These have a status of Draft.
-
You can change any details (as long as you have the correct permissions), apart from the invoice number.
-
If you want to change to a different customer, so you can keep the same invoice number, you must remove all lines from the invoice first.
-
You can add and remove lines and change quantities and prices as required.
-
If the invoice has payment, you can't make the total value of the invoice less the payment amount. You must also reduce the payment value.
-
If you try to amend a printed invoice, you'll see the View Invoice screen.
-
For printed invoices:
-
If you need to change the customer order number or address, you can do this from the Reprint screen.
-
For anything else, you must cancel the invoice and recreate it with a new invoice number.
-
Copy invoices
Open: Invoicing > Invoices > Enter New Invoice
You can create a new invoice by copying an existing one. Just click Copy Invoice and choose the invoice to copy from. You can do this even of the invoice to be copied is for a different customer.
You can only copy from other invoices created in the Invoicing module. Use the Find button to search by date, customer or customer order no.
Change the date of an invoice
If the invoice hasn't been printed, you can amend the invoice and change the date.
If the invoice has been printed, you'll need to cancel the invoice and recreate it with a new invoice number. To do this quickly, you can just copy the cancelled invoice.
Quickly find stock items
Start typing the code of the item in the stock Item column. The list of stock items is filtered as you type.
Add a line with a negative value
If you need to show a negative value on an invoice, you can do this by using a free text line. To do this, you need to enter the selling Unit price as a negative value.
Note: The overall invoice value must still be positive.
Add carriage and other charges
You can add additional charges, such as carriage and insurance.
-
Choose Charge as the Line Type.
-
For an one-off charge, enter the details on the grid. You'll need to edit the line to add the nominal code.
-
For regular charges, select Item and choose the code. Edit the line to change the description, nominal account, VAT, etc.
-
Add a payment
You can enter a payment at the same time as entering the invoice. This is useful is for cash customers and for taking deposits. When the invoice is posted, the payment and the invoice transaction are posted to customer's account and allocated to each other.
To record a payment:
-
Select the Payment with Invoice tab and enter the payment details.
-
Choose a payment Method. This includes the bank account the payment is paid into.
Note: You can't do this for a foreign currency invoice.
Enter or change analysis codes
Analysis codes are additional custom fields that you can set on the whole invoice, and also on lines in the invoice.
You can use the analysis codes to use to identify or group your orders and invoices; for example, by geographical region, salesperson, or promotion.
-
For the whole invoice - choose the analysis codes on the Analysis Codes tab.
-
For each item in an invoice - choose to Edit the invoice item then select Analysis Codes.
If you don't want to apply an analysis code, leave the analysis code Value blank.
See the invoice profit
The invoice profit isn't shown on the enter or amend invoices screens. Once you've saved the invoice, you can check the profit from the View screen.
Cancel an invoice
You can cancel an invoice as long as it hasn't been posted. The whole invoice is cancelled and the invoice is given a Cancelled status.
If you've made an error, you'll need to enter the invoice again, which will have a new invoice number.
Open: Invoicing > Processing > Cancel Invoices and Credit Notes
View customer alerts
If alerts have been set up for this
To view the ![]() icon next to the
icon next to the
See Customer alerts.
View stock item alerts
The Alerts column will show you when stock item alerts have been set up for this activity and
To view the stock item alert messages, click the alert ![]() icon in the Alerts column.
icon in the Alerts column.
See Stock item alerts.
Useful info
About invoice numbers
The invoice number is assigned when the invoice is saved, and the number is incremented by one each time. You can set the starting number for invoices in the settings, but once you enter an invoice the starting number can't be changed.
Invoice numbers are used by both Invoicing and Sales Orders, so your invoice numbers are assigned to each one in order. For example, you create invoice for an order so this has number 1, and then you save an invoice using Invoicing which will be number 2.
All your invoices, both from invoicing and sales orders, can be seen on the Invoicing List.
What if I cancel an invoice?
If you cancel an invoice either before or after it's printed, then that invoice number is marked as cancelled. You can see these invoices on the Invoicing List with a status of Cancelled.
Only show products stored in a specific warehouse
Stock items are selected from the warehouse they're to be despatched from. If a stock item is stored in more than warehouse, then it'll appear more than once in the list of stock items.
If you enter warehouse in the By default supply from box, then the list of stock items you can choose from is filtered to show only items stored in this warehouse.
If you have several warehouses, and you want to make sure that your staff pick from the right one, then you can set a default warehouse per user. When the user enters an invoice this warehouse is set as the default, so they will only see stock items stored here.
You can set the warehouse for a user in User Permissions, and choose default warehouses for both orders and invoices. See Invoice and order user permissions.
When the user enters the invoice or order, the warehouse is selected as By default supply from. They can change this to a different warehouse or All if required.
This is useful if you have several branches in different locations and you want to be sure that local stock is picked first.
If the By default supply from field is blank or set to All, then the Item list will show all stock items, the warehouse, and the amount of free stock in each one.
All stock items have to have a warehouse. If you don't want to use separate warehouses, then you just need to set store all items at the default Home warehouse. If you only have one warehouse, then the warehouse will default to this one.
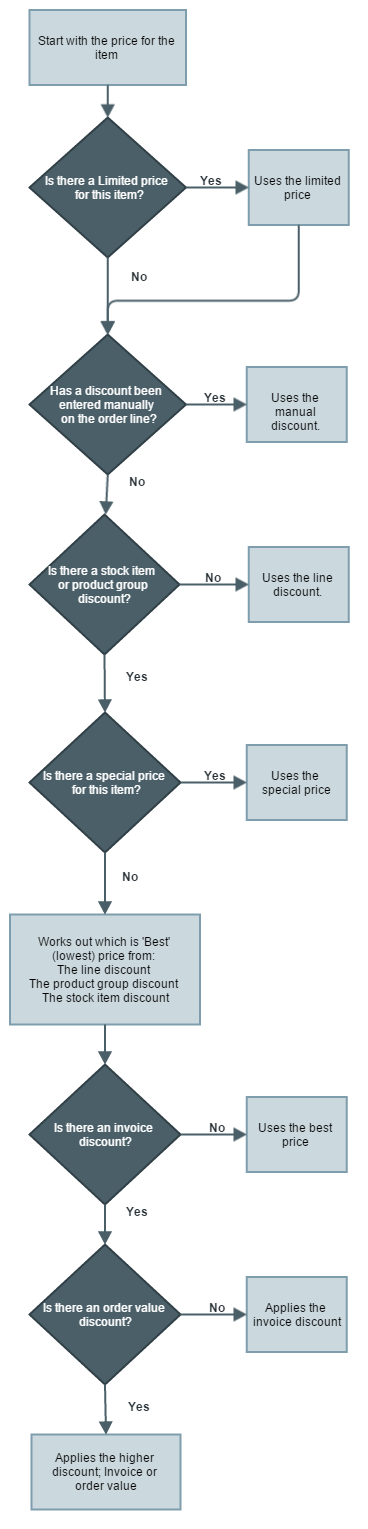
How discounts are applied
You can set up a variety of different discounts in Sage 200 for your stock items, such as per product group, per stock item, per invoice value, and so on. Where multiple discounts can be applied to the same line on an invoice, the following rules are applied:
-
A line discount is applied to every line on the invoice with a value.
-
A manually entered discount on a line overrides all other line discounts.
-
An invoice discount is applied in addition to any line discounts.
-
If an invoice value and invoice discount are applied, the best discount is used.
-
For stock items:
-
If a line, stock item and product group discount are all applicable; the best discount is applied to the line.
-
A special price overrides all other levels of discount on the line.
-
A surcharge overrides all discounts except a special price.
-
A mark up price will override all other discounts.
-
Use Invoice Payments
Sage Invoice Payments is a great way for your customers to pay you online, quickly and easily.
Use Sage Invoice Payments to request payments from your customers, using the payment providers Stripe, PayPal, or GoCardless.
You generate invoices with a Pay Now button, then email the invoices to your customers. Your customers then select the Pay Now button to pay the invoice using the payment provider that you've chosen.
After your customer pays the invoice, the transactions can be downloaded and posted in Sage 200.
Invoice Payments integrates seamlessly with Sage 200, making it easier for your customers to pay you, and easier for you to process those payments.
-
Select Invoice Payments to get started.
This button is not displayed if you've already set up Invoice Payments.
Note: You can only set up Invoice Payments if you have permission to access Cash Book Settings.
See Take payments using Invoice Payments.
Fix it
Can't change the price or discount?
You must have the correct additional permissions to change the price or discounts of any stock items.
See Invoice and order user permissions.
Can't find a stock item
-
Only items that are stored in the selected warehouse set as By default supply from are shown in the list. Try changing this to All.
-
Check that the item is not set as Inactive. Inactive stock items are not shown in the list. If you don't set a warehouse for stock item, then it's set to Inactive by default.
-
Stock items will not be displayed if they're configured to be used with back to back sales orders, and have a fulfilment method set to From supplier via stock.
Can't choose save and print?
You can't Save and print if the customer has exceeded their credit limit, as the invoice is automatically put on hold.
If you have the correct user permissions, you can override this when you enter the invoice.
See Invoice and order user permissions.
Need to enter invoice for VAT only?
This is done using the VAT only invoice screen.
Open: Processing > Enter VAT only Invoice.
What happens when I
Save the invoice
-
The invoice is assigned an invoice number.
-
The invoice status is set to Draft.
Save and print the invoice
-
The invoice is assigned an invoice number.
-
The invoice status is set to Printed.
-
You won't be able to amend the invoice.
-
The invoice is printed using the layout set on the customer's account.